
Hashtag yes please!
100% organic (apart from the bacon).
Happy Eating!
– SUSANNAH 
Hashtag yes please!
100% organic (apart from the bacon).
Happy Eating!
– SUSANNAH

Happy Saturday!!!
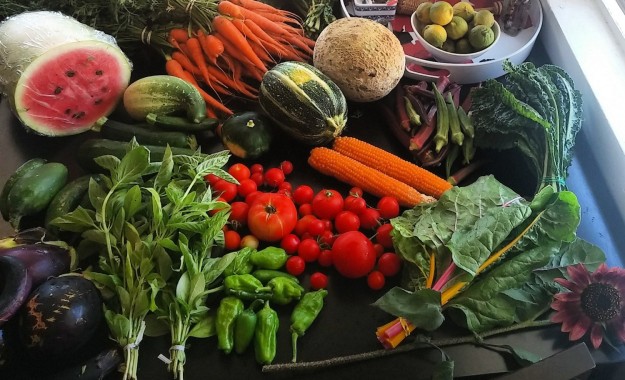
Here’s a look at what’s growing in our garden. Can’t wait to harvest and eat these future noms.

Happy Eating Blogosphere.
– SUSANNAH

HAPPY FRIDAY!
Hope everyone is ready to relax their way into the weekend. I know I am! I was grateful for the long 3 day weekend that just passed, but man oh man do those short weeks kill me at work. So much work crammed into such little time. So, if you’re anything like me, you’re ready to decompress, relax, and enjoy a nice meal or two. It is with that in mine that I present to you: HOMEMADE SUSHI!
A little background here: the food of the sea is not my friend. #truthbomb
I love the ocean. I love all seafood I can eat. I love raw fish.
But fish, fish does not love me. It actively plots my death. I cannot eat lobster, crab, eel, crawfish and I am sure others I have not tried because, well, I enjoy breathing.
As you can imagine this proves difficult. Not only because eating out can be difficult if the establishment serves any of the above, but also because it often prevents my boyfriend from dining on one of his favorite meals: sushi. *sad face* So while he’ll gladly head out for a man-date or a working dinner at his favorite sushi places, we can never dine together. No romantic meals. No exploring highly YELP rated whole-in-the-wall establishments. Quite frankly – it sucks.
So this Valentine’s Day I thought I’d surprise him with a homemade sushi dinner! This post will take you through the basic steps of at home sushi making. It wasn’t easy. Parts of it were not pretty. But in the end the old ball in chain was so happy for the sentiment and did enjoy eating some crispy shrimp rolls in the comfort of his own home.
So let’s get started!
First the disclaimers:
1. I have now made sushi at home 6 times. I get better each time. The first 2 times were a sh*t show. Don’t judge yourself. It’s hard.
2. I studied a lot of videos online before trying. Just head over the youtube. It’s full of options. Watch. Re-watch. Watch again. Have some sake. And head to the kitchen.
3. Do your research and find the best local, authentic market to do your shopping at. If you’re in San Diego check out the Nijiya Market- Address: 3860 Convoy St #109, San Diego, CA 92111 Phone:(858) 268-3821. You’re Welcome.

INGREDIENTS-


 THE BAMBOO MAT-
The mat is absolutely essential for rolling sushi- especially as a beginner. Read here for a great synopsis of the how to and why of using the bamboo mat to roll your sushi.
STEP ONE:
Make your rice. I used a rice cooker, it’s definitely not required, but it is a huge time saver. When your rice is finished. Remove from cooker (or pot) and place into a large mixing bowl. Add the sushi vinegar, or vinegar powder, mix throughly, and place uncovered in fridge for 30 minutes.

Let’s talk a little bit about sushi vinegar. A lot of the recipes I studied online called for it. They screamed about not using substitutes, not using just rice vinegar or plain vinegar. I don’t know all about that. But what I DO know is that I have a friend who makes homemade sushi all the time and she swore up and down not only was it “okay” to substitute the powder, but even better. She preferred the taste and it was a huge money saver. I have now used that above packet for 4 separate sushi sessions.
BTW – shout out time, my sushi adventures would not be possible without tips and guidance from Ms. Chizu Buckalew. She’s a sushi connoisseur. Check out her food Pinterest page here!
—
STEP TWO:
Make your shrimp. In a medium size bowl beat your 2 eggs with either a fork or a whisk. In a separate bowl place your panko crumbs. Lastly, in a 3rd bowl place your cooked – no shell – shrimp. Now you have your shrimp assembly line. One at a time dip a shrimp into the egg, allow the excess to drip off back into the bowl, dip the same shrimp into the panko, and set aside. Do this until all shrimp are coated.
Heat 2 tablespoons of olive oil in a medium skillet. When the oil is hot, add the shrimp to the pan and fry them. (NOTE- you’ll know the oil is hot enough when you spritz a few drops of water into the pan and they sizzle.) Fry the fish for a couple of minutes on each side until they are crispy and brown. Do not burn. Set shrimp aside and allow to cool. ** Wash your hands thoroughly. Raw eggs can contain salmonella, and ain’t nobody got time for that! **

—
STEP THREE:
Prepare your veggies. Time to get your cucumber and avocado ready. Peel your cucumber completely and cut into strips lengthwise as shown in the below photo. For the avocado, remove the pit and the skins and slice lengthwise as well (not pictured.)

—
STEP FOUR:
Get ready to roll. Now it’s time to assemble your rolls! Remove your rice from the fridge so that it may come to room temperature.
Find a flat clean surface to prepare your rolls – I used my kitchen table. Put your bamboo rolling mat either inside plastic wrap or a large ziploc bag. Place 1 sheet of the nori seaweed onto the mat – smoothe side down. Spread a thin layer of rice onto the sheet, being careful as to not rip it. Sprinkle with sesame seeds.

Now assemble your innards! Place a line of shrimp – no more than 4, 1 or 2 slices of cumber, and 1 or 2 slices of avocado. Do not overstuff. Even though the tummy thinks it wants as much in there as possible, it will make it hard to roll. This is sushi, not a burrito.

Now it’s time to roll. AGAIN I really recommend you find a video online and watch it a few times. It’s truly an art, rolling sushi. Here’s my recommendation: VIDEO.

Don’t worry if guts pop out as you go. Just set it aside and keep rolling! When you’re done, set the roll aside.
NOTE- The above makes a sushi roll with the rice on the inside, and the seaweed on the outside. If you want to make the inverse (i.e. rice on the outside) complete the same process of spreading the rice on the nori and sprinkling it with sesame seeds. But this time flip the seaweed and place the “blank” side up before assembling your shrimp, cucumber and avocado. Roll as shown above.

The first method is easier, the seaweed keeps the contents intact, but really, the rice on the outside method isn’t that hard either. They are both fun to look at so I recommend trying both!
—
STEP FIVE:
Slice ’em up! It’s time to cut your rolls. I read online this was the step to dread, and dread it I did. I researched what knife to use, how sharp it should be, etc. In the end, that was all lame BS. It was super easy to slice! Just ensure you use a non serrated edge, that it’s sharpened, and that you slice with enough pressure to mean it, but not so much to squish the roll.

YAY!!!
—
STEP SIX:
Serve it up! It’s time to plate your sushi. Have fun with it. Add more sesame seeds. Decorate with sauces. I definitely got better at this each time I tried. In a later post I’ll give you guys my recipe of the spicy ginger mayo sauce I used on my second try, IT WAS DELICIOUS (pictured below.)
*** Don’t forget to enjoy it with a side of edamame, some sake, some great Japanese beer! ***

ENJOY!!!
– SUSANNAH
